Replacing the Heater Core
on a 1982 AMC Eagle
|
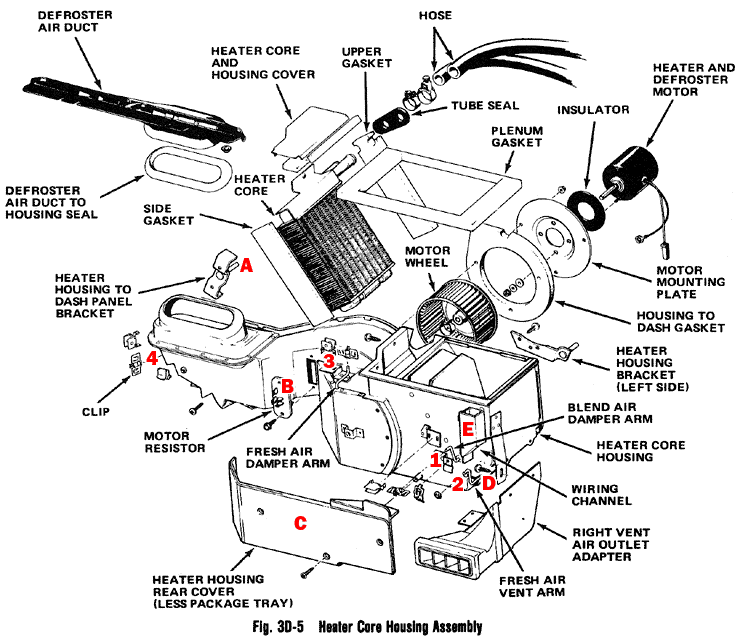
Replacing the heater core in an AMC is definitely no fun, but it can be done by the average shade-tree mechanic using ordinary tools. It just takes time, patience and a fair amount of discomfort. The AMC technical service manual (TSM) outlines the procedure reasonably well, but based on my experience, I have annotated the TSM’s procedure for the benefit of do-it-yourselfers. It should apply pretty well to other years and models. Thanks to fellow AMC-Lister Terry Warren for transcribing the instructions from his 1980 TSM. Notes: What the TSM refers to, somewhat ambiguously, as “housing,” I refer to as the “plenum.” The TSM instructions are in monospace type; my notes are in red. |
|
REMOVAL |
|
(1) Disconnect battery negative cable. (2) Drain approx. 2 quarts of coolant from radiator. (3) Disconnect heater hoses from heater core tubes in engine compartment. Plan to replace one or both the heater hoses. They tend to stick to the core tubes and have to be sliced off. Hey, they’re cheap, so why not? Also note that the hoses are two different sizes: 3/4” ID and 5/8” ID. Be careful not to score the tubes if you have to cut off the hoses. The tubes are soft (copper or brass). (4) Install plugs in heater core tubes. Better yet, blow out the coolant with compressed air and leave the tubes unplugged. I plugged mine with cork, which broke off and got stuck inside the tubes as I removed the plenum. This step is merely intended to avoid spilling any coolant in the passenger compartment. (My passenger’s side carpet was soaked with coolant from the leaking heater core anyway.) (5) Disconnect blower motor wires and remove blower motor and fan assembly. (6) Remove housing attaching nut in engine compartment. There are three of these: one right above the blower motor (it likely has a wire harness anchor bolted on it, too); one a few inches below the blower; and one behind the engine, just on the driver’s side of centerline, behind the cylinder head (assuming you have a six). This one, labeled “A” on the illustration, can be hard to spot. On post-1980(?) sixes, you’ll want to unplug the wire from the coolant temperature sensor at the back of the head to get it out of your way. Don’t forget to reattach the wire later! You’ll want a 7/16” deep-well socket for these nuts. (7) Remove package tray, if equipped. (8) Disconnect wire connector at blower motor resistor. There probably are two connectors here, a three-wire and a single, on the plenum, up behind the left end of the glove box. (Now that we’re inside the car, “left” means driver’s side, “right” means passenger’s side.) “B” on the illustration. (9) Disconnect heater, defroster, and blend-air door cables at housing. You may have to first remove a flat plastic cover on the plenum. “C” on illustration. There are four cables to worry about. Two of them, marked “1” and “2” on the illustration, are on the front (from your perspective, inside the car) of the plenum, easy to get at. The third, marked “3,” is on top, easier to access if you remove the glove box. I generally prefer to remove a few more screws in exchange for spending less time contorting myself under the dash. There will be plenty of “floor time” in this operation as it is. The last cable, “4,” is over on the left side of the plenum, accessible from the driver’s side floor. If you don’t have a/c, rejoice! The aftermarket a/c unit on my car was totally in the way of this cable, and that end of the plenum itself, adding HOURS to the process. (10) Remove door sill-plate. (11) Remove right cowl trim panel. (12) Remove right windshield pillar moulding, instrument panel upper attaching screws, and screw attaching instrument panel to right door hinge post. Here “instrument panel” refers to the entire dash, not just the instrument cluster. You will need to remove these top screws (up by the windshield) all the way across to the driver’s side. You don’t really need to remove the “screw” (bolt) holding the right side of the dash to the frame. The bracket has a slot with an indent on top. You can loosen the bolt and slide that side of the dash back until the indent rests on the bolt. It will hold the dash out for you—just a tad, but enough if you don’t have a #$%*@!! a/c unit in the way. (There’s an identical bracket on the other side, too, but it’s hiding behind the e-brake release mechanism.) You might also find it helpful to move the computer out of the way. It’s attached to a bracket that’s secured to the frame by three small ( 1/4” hex head) sheet metal screws. (13) Remove housing attaching screws. Hmmm, I only recall one bolt holding the plenum from the inside. It’s a couple of inches below the right-side dash attachment bolt, “D” on the illustration. On my ’82, there’s a silly little snap-top box, labeled “E,” attached to the far right side of the plenum, which routes a small wire harness. If you have one, you’ll have to free the wires from this before the plenum will come out. Also, if you have a remote-control passenger’s side mirror, be prepared to fight with the cable as you remove and reinstall the plenum. You can free the mirror joystick control (just to the right of the steering wheel, near the passenger’s side air control) by unscrewing its bezel. This will give you valuable slack in the cable, but be warned that it is much harder to put the control back in place than it is to free it! (14) Pull right side of instrument panel slightly rearward and remove housing. (15) Remove cover and screws attaching heater core to housing and remove heater core from housing. |
|
INSTALLATION |
|
(1) Position heater core in housing and install cover and retaining screws. NOTE: Ensure that heater core seals are in proper position to prevent air bypass around perimeter of heater core. Be prepared to replace the foam insulation across the top of the plenum and on the doors inside. Remove or secure loose flops of insulation inside the car, which could prevent the plenum from seating correctly. Also, make sure the wire harness up where the plenum meets the defroster duct doesn’t get caught between as you reinstall the plenum. (To see what I’m talking about, you will have to make yourself very small, very flexible or possess X-ray vision. Aaaaargh!) I looped a piece of string around the harness and up through the gap between the dash and windshield/firewall to hold it out of the way. (2) Pull right side of instrument panel rearward and position housing on dash panel. “Dash panel” here means the firewall. In other words, pull the right side of the dash back and put the plenum into place. You may have to play with the angle a bit to get the heater core tubes to fit through the slot in the firewall. After the tubes, go for the left-side bolt. The other two bolts should fall right into place. (3) Install housing attaching screws. (4) Install right cowl trim panel. (5) Install door sill plate. (6) Install right windshield pillar moulding, instrument panel upper attaching screws, and screw attaching instrument panel to right door hinge post. There’s a thin strip of molding at the front edge of the dash where it meets the windshield/firewall junction. Make sure it’s in place before you secure the dash. (7) Connect heater air, defroster, and blend-air damper door cables to housing. Adjust cables. (8) Connect wire connector to blower motor resistor. (9) Install package tray, if equipped. (10) Install housing attaching nut in engine compartment (11) Install blower motor and fan assembly and connect blower motor wires. (12) Remove plugs from heater core tubes and connect heater hoses in engine comparment. Don’t forget to pack new insulation (I used electrician’s putty) where the tubes come through the firewall. (13) Connect batter negative cable (14) Replace coolant previously drained. (15) If equipped with clock, reset clock to correct time. One final note: You can’t cut out a piece of plenum and firewall to make removing and reinstalling the core easier next time. The wheel-well sheet metal is in the way of the bottom third or so. :( |
[Top] [Main Eagle page] [Rambler Dan’s AMC Home]