Valve Cover Replacement Options
for the AMC 258 cid (4.2L) Six
and Installation Information for the
Four Wheel Drive Hardware Cover
on a 1982 AMC Eagle
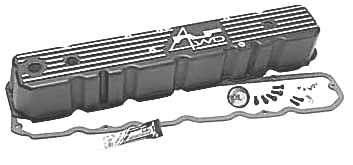
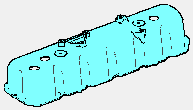
The 4WD cover appears to be pretty well made, though I find the big 4WD logo cast into the top of the unit annoying. The cover includes pretapped mounting points and screws for pollution-control paraphernalia, holes for the PCV system, grommets, gasket, sealer, and instructions. 4WD also offers this cover in blue and red, and without the 4WD logo in black. |
 |
|
Item 639493—$109.95 plus shipping 4WD also offers a plastic cover. |
|
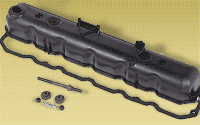
Four Wheel Drive Hardware installation instructions:CAUTION: Do not use rubber gaskets or you will crack the valve cover! The cork type is recommended.1. Dry fit the valve cover to the head to insure all bolt holes and valve cover will properly align. 2. You will find that five of the aligned holes will have no threads. Tap these holes with a 5/16” diameter x 18 thread “bottom” tap. You may find that some early heads have no holes on each end of the head. If so, you must mark these positions on the head using the valve cover as a template. These marks must then be drilled and tapped with a 1/4” diameter x 20 thread “bottom” tap. Note: Caution should be used when drilling and tapping holes to not allow metal shavings to enter the oil return holes in the head. This may be accomplished by placing a magnet with a hole in the center of it around the hole while drilling. If rocker arm bridges with studs are present, you must replace them with non-studded rocker arm bridges (Part MRM1718). 3. Be sure to clean the head of all foreign substances and wipe down the gasket sealing surface. Apply a thin coating of Valco Hylomar to secure the gasket to the valve cover, making sure all bolt holes are properly aligned. 4. You may now install your new cover. First, loosely install all screws enclosed. Then, starting from the middle of the valve cover, work your way out toward each end. Securely tighten screws, but do not overtighten, as you may crack the valve cover. 5. Start engine and check for any oil leaks. If a leak occurs, check gasket for proper installation. Note: Gasket used in kit is a Victor VS50061. |
Notes
|
1) I found it well worthwhile to remove the wiper motor. Reinstalling
the clip that holds the motor arm to the linkage is tough the first time, but it
gets easier with practice. Pulling the wiper motor gives you room to maneuver
when you remove the old cover and install the new one. Also, with the wiper motor out you can put a short bungee around the heater hose and wiring harness to pull them out of the way (remove one of the wire clamps near the motor, too). You can clip the ends of the bungee into the ventilation slots at the top of the cowl. Getting at the rear valve cover bolt is a pain—even more so with the new cover—so you’ll need all the help you can get. It might also help to remove the upper radiator hose at the thermostat (bottom) end. This will require draining about a gallon of coolant. 2) Take 4WD’s advice about putting a magnet over the holes before you tap; it catches a lot of filings. Radio Shack sells a magnet that’s just right—flat, 1 1/2” round with about a 3/8” hole. It comes in packages of five now (Catalog No. 64-1888), though you might still find them loose in some stores. 3) I started the threads with a regular 5/16”–18 tap because it’s easy to start and control, then I used a bottom tap to finish the job. Be sure to hold the tap straight or the bolt will end up going in crooked. I found the two holes on the driver’s side of the engine weren’t quite deep enough, so I drilled them down another 1/16” or so. This allowed the bolts to seat deep enough that I don’t need to use washers. NOTE: 1985-87 heads reportedly need to have the three right-hand (passenger) side threaded holes drilled out to 1/4” before tapping. Do not make the holes any deeper. You won’t find bottom taps in every hardware store. Call around to the more industrial-type places that cater to contractors and machine shops. If you have an early 1981 head without holes in the front and rear, drilling and tapping the rear hole is going to be difficult. Best to do it on the bench if possible. 4) Two of the rocker bridges have studs used to hold down the plastic cover. Here you have three choices: replace them with non-studded bridges, cut off the studs, or press/hammer the studs out. Cutting off the studs avoids having to remove the bridges but creates the danger of metal filings getting into the engine. I didn’t want to buy new bridges, so I removed the old ones and hammered out the studs. The rocker bridge is surprisingly flimsy, so heed the TSM’s advice to loosen each bolt in a pair alternately, a little at a time, so as to avoid bending the bridge. If it does get bent, you can straighten it in a vise. After I removed the bolts holding the bridge to the head, the pivots came off with the bridge, held on with accumulated crud. Be careful a pivot doesn’t fall off as you’re carrying the bridge over to the workbench. It only takes a few taps with a hammer (preferably brass) while holding the bridge in your hand to knock the pivot off. Notice that the pivot has oiling grooves in a V shape. Scrape any accumulated crud out of these grooves and be sure to put the pivot back so the grooves match those in the rocker arm. It’s probably best to match the pivots with the rocker arms they came out of. Holding the bridge tightly in a vise, put a couple of nuts on top of the stud to prevent it from mushrooming, and hammer the stud free. Remove the nuts and the stud will fall right out. Clean all parts, apply assembly lube and reassemble. The TSM says to torque the bolts to a mere 19 foot/lbs. That seems shockingly little to me considering there’s no lock washer or instruction to use thread locker, but that’s what I did. I’ll let you know if the bolts work loose. 5) The 4WD kit comes with female Allen-head bolts, so you’ll need long 1/4” and 3/16” Allen keys to drive them. The Allen bolts work great on the sides and the front, but I used the original hex-head bolt on the rear because there wasn’t sufficient clearance to turn my Allen key. For some reason I couldn’t magnetize the bolt and/or socket, so I tore off a shred of blue paper shop towel, draped it over the top of the bolt head, and pushed the socket on. This kept the bolt from falling out while I fished around for the bolt hole. A flexible 1/4” drive extension is invaluable here, since you can’t really get a straight shot at the hole from above. |
Addendum, July 2000 |
I noticed a small oil leak about 21/2 years after installing the cover. Taking the cover off, cleaning both surfaces, applying sealing compound and putting everything back together was no more challenging than the same procedure for the pre-1980 steel cover, except for all the pollution control stuff that had to be disconnected and reconnected. The usual advice applies: Make all surfaces squeaky clean; apply sealant evenly and sparingly; and torque evenly and not too much. All in all, I’m satisfied with the 4WD unit. |
| [Top] |
Other Sources
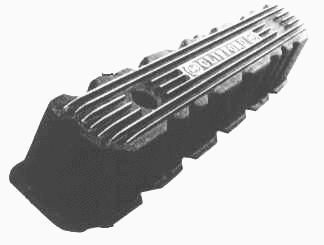
Clifford Performance (aluminum)Inline-six specialist Clifford Performance also offers replacement covers. I haven’t seen one of these units, but I welcome comments from anyone who has used it.Includes holes for PCV system, gasket, sealer, screws. Item 47-4060—$166.40 plus shipping (Also offered: Item 47-4050, replaces 1964-80 steel cover) |
 |
|
Westside Performance (aluminum)“Fits ’81-up 258 AMC (Jeep) 4.2 L-6. Replace that leak-prone plastic valve cover with a reusable aluminum valve cover. Provisions for all factory accessories. 100% American-made. The last valve cover you’ll ever need to buy.”www.westsideperformance.com/valvecover.html |
 |
||
|
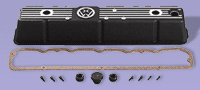
J.C. Whitney (aluminum)Mail-order catalog retailer J.C. Whitney Co. sells an aluminum cover, apparently made by wholesaler Omix-Ada (which offers other options as well).“Cast Aluminum Valve Cover, for ’81-86 Jeep CJ Series, Scrambler, Wagoneer, Cherokee and AMC Eagle, Concord, Spirit, AMX, Pacer, Gremlin, Matador, Hornet, Javelin, Ambassador, with 6-cyl. 258 (4.2L) engines.” Item 07ZX6011U—$129.95 plus shipping |
 |
Turner 4WD Parts (aluminum)Jeep parts specialist Turner 4WD Parts offers another aluminum cover (it too seems to be an Omix-Ada product), with the following marketing info: |
|||
Part No. 83501398KA—$99.95 plus shipping |
 |
||
|
|||
Mopar (plastic)I haven’t been able to find online information directly from ChryCo on OEM replacement kits, but Specialty Parts, a Jeep parts retailer, carries Mopar plastic covers as well as the Clifford aluminum cover. Specialty has a nicely illustrated (if clumsily coded) technical info page on replacement options.Specialty Parts 4731 Central Way Fairfield, CA 94533 Voice 800-504-5337, 707-863-8377 Fax 707-863-8444 www.specialtyparts.com |
 |
J.C. Whitney (plastic)J.C. Whitney advertises two plastic covers. The Web site calls them “chrome plated,” but this seems to be a case of misguided copywriting.Item 38ZX8164B (’80–82)—$64.95 plus shipping Item 12ZX8433A (’83–86)—$58.95 plus shipping |
 |
[Top] [Main Eagle page] [Rambler Dan’s AMC Home]