Spring-Holding Tool Stud Designs
I believe the Mac Tools style spring-mount stud shown in my holding tool plan is the best design. However, as it might not be possible for some people to have such a stud machined, here are some suggestions for an alternative.
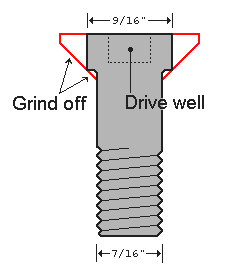
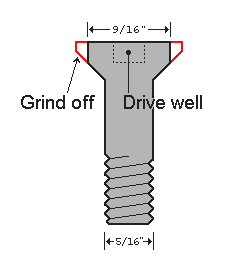
You could take a 7/16” Grade 5 bolt and grind the head round to 9/16” diameter. There are two drawbacks to this method:
- You would have to quench the bolt continually to keep it cool during the grinding process, because overheating the bolt will affect its temper and reduce its strength. This is a critical safety consideration!
- Once the head is round, it will be difficult to tighten the bolt into a threaded plate (see below), and it would be impractical to grind the head after installation.
In selecting bolt size, there are trade-offs:
 |
|
 |
||||||
Forces at Work
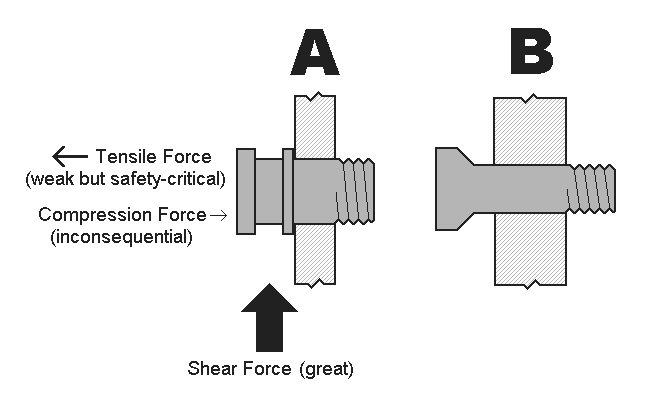
In this application (holding a partially compressed Rambler front coil spring), almost all the force exerted on the stud is in the shear plane. Some tensile force is also possible, so it is important to secure the stud to keep it from being pulled out of the plate. Since no pressure is likely to be exerted that would press the stud back toward the plate, securing the stud in the compression plane is merely a matter of convenience in handling and placing the tool. Figure A below illustrates the forces this stud will encounter.
Mounting Methods
Figure A above shows the Mac Tools style flanged stud in a 1/4” steel plate. The stud shaft is 7/16” thick, and the threads begin where the stud has passed through the plate. The inner flange secures the end of the stud opposite the nut (not shown).
Figure B shows another approach. A 5/16” Grade 5 flathead bolt passes through a 1/2” steel plate. The bolt has a 5/8” long shoulder, so the threads begin where the bolt has passed through the plate. Here, a nut will have to be secured to the back of the plate with epoxy or a spot weld. (CAUTION: If spot welding, take care not to overheat the bolt! This will affect the temper and reduce its strength.)
|
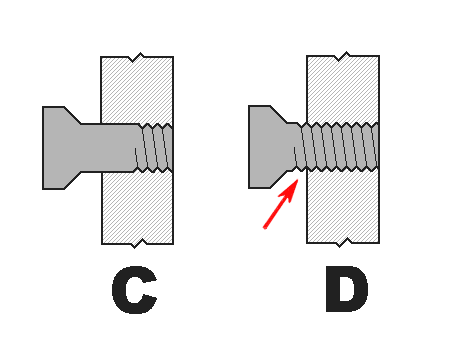
Figure C is a workable alternative to Figure B. The bolt’s shoulder
is shorter; the threads begin about halfway into the plate. No nut is
needed. Figure D shows a bolt with minimal or no shoulder. The thread cut creates a potential fracture point right where the shear force is greatest (red arrow). This design has been tested to 3,500 pounds (875 pounds at each of four bolts) without failure, so it should be OK for this application. Even so, IMHO it is not optimal. |
|