Passenger’s Door Lock Switch
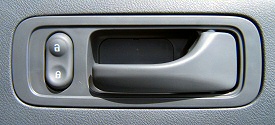 Figure 1 |
|
Though not rocket surgery, this is not a trivial job and should only be attempted by those comfortable working with wiring.
Operation
The door locks are activated by DC solenoids. When current flows in one direction through the coil, the armature moves one way; when the current is reversed, the armature moves the other way. Figure 2 reproduces the portion of the Honda schematic pertaining to the passenger's door lock actuator. (The two relays, which we'll call RL1 and RL2, are part of the MCU.)
Normally the relays connect the passenger's door lock actuator to ground on both sides, so nothing happens.
When the driver's lock switch is in the "down" position, the MCU activates RL1, which puts +12V at actuator connection 1, causing it to lock.
When the driver's lock switch is in the "up" position, the MCU activates RL2, which puts +12V at actuator connection 2, causing it to unlock.
 Figure 2 |
Figure 3 shows the addition of two relays, RL3 and RL4, in series with the OEM circuit. A dedicated OEM switch (SPDT, momentary, normal-off) energizes the relays. This arrangement isolates the passenger's lock circuit by essentially duplicating the stock setup "downstream" of the MCU. (Note: You could use SPDT relays; DPDTs are shown because this Radio Shack relay, p/n 275-218, is inexpensive and readily available.)
When the passenger's door lock switch is in the neutral position, neither relay is activated, and the stock circuits are completed through connections 1 and 9 on each relay.
When the passenger's door lock switch is in the "down" position, RL3 is activated. This opens the stock circuit on that side and applies +12V to relay connection 9, which puts +12V at actuator connection 1, causing it to lock.
When the passenger's door lock switch is in the "up" position, RL4 is activated. This opens the stock circuit on that side and applies +12V to relay connection 9, which puts +12V at actuator connection 2, causing it to unlock.
 Figure 3 |
Relays
Color-coded wires were soldered to the relays, with ground and power shared (Figure 4). The relays then were placed in an old "wall wart" transformer enclosure (Figures 5, 6).
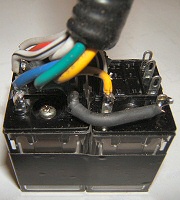 Figure 4 |
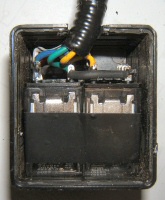 Figure 5 |
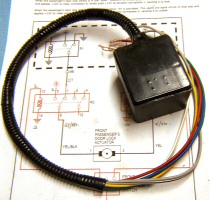 Figure 6 |
Switch
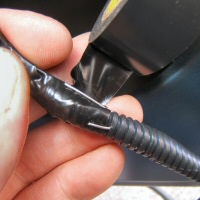
The switch is Honda p/n 35380-S9V-A02ZB, the same as used on the driver's side. The attachment tangs are quite small and close together, and no known non-Honda connector fits. So for each wire I took an uninsulated 22-18 gauge butt connector (Radio Shack p/n 64-3036) and flattened one end to fit over the tang, crimped it to the wire, and shrink-wrapped it (Figure 7) This was done for each of the three wires, which were then pressed onto the switch (Figure 8). Then I liberally shrink-wrapped the outside for strain relief.
 Figure 7: From top, unmodified butt connector; connector flattened on far end and ready to be attached to wire; connector crimped onto wire; shrink wrap applied. |
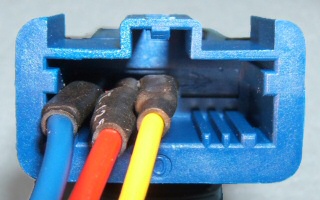 Figure 8 |
UPDATE (December 2008): The correct connector is Honda p/n 04321-SR3-306. Wire pigtails with correct ends are p/n 04320-SP0-A00 and 04320-SP0-B00. Either will work; the only difference is wire gauge.
At the other end of my harness, the power wire has a female quick disconnect, and the wires that go to the relays have male connectors. That avoids accidentally reversing the electrical polarity, but it's easy to swap the "up" and "down" wires if necessary.
Handle Assembly
The replacement handle assembly with a provision for the switch is made for the driver's door on right-hand drive cars. It's Honda p/n 72125-SCV-J01ZB (gray). Though the part was made in the U.S., I had to buy one from J's Garage Export in Japan. It cost $37 U.S. and yes, more than half of that was for shipping. Amazingly, it only took four days from receipt of payment until the package arrived at my door.
Installation
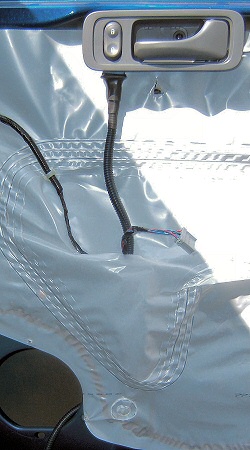 Figure 9 |
|
|||||||
Attach quick disconnects in such a way that in the future, the wires can be returned to original and not misconnected (female disconnect on one wire at connector, male on the other, etc.).
Attach power, ground, and relay connections as indicated in schematic. Reconnect OEM connector. If you wired everything correctly, all should be in working order, with the passenger's switch operating only the passenger's door lock, and the driver's switch operating all the locks.
Reinstall door panels and glovebox.
Tips
Color-code all wires and mark the colors on the schematic.
Test, test, test! Make sure every component works as it should and that all wires are correct before proceeding with the next step.
You'll need about six feet of wire on the door switch.
Getting at the OEM connector is tricky. You will have to remove the OEM harness anchors inside the door and carefully pull the harness into the car as far as possible. Even then there won't be much room to cut the wires and attach quick disconnects, so take your time and be careful. Once the connections are made and the OEM connector plugged back in, pull the harness back the way it was, and reattach the anchors inside the door. Do a final check to be sure the OEM harness and the passenger's door switch wire bundle are secure and will not interfere with the operation of the window.