Roof Rack Spare Tire Attachment
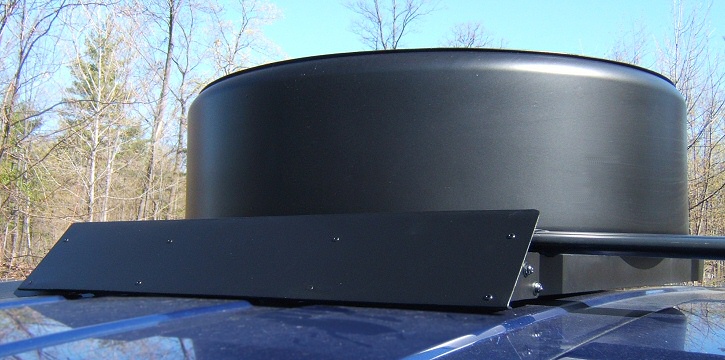 Figure 1 |
The space under the rear deck where the emergency "donut" spare tire is stored is too small to accommodate a full-size spare, and there's never enough room to stow emergency gear. A roof-mounted spare would solve both problems. A full-size tire doesn't quite fit between the bars of the OEM rack. I considered an add-on basket, but wanted to minimize weight and mount the tire as low as possible.
My idea was to create an H frame, with two longitudinal members (longerons) suspended beneath the rack, connected by a crossbar. A bolt anchored to the crossbar would hold the wheel through one of its lug holes. I decided two bolts are better than one, and a second crossbar would make the structure more rigid and easier to install (Figure 2).
Because the top of the tire was to be covered, I elected to add a piece of sheet aluminum to block dirt from below. That required the addition of two outer stanchions to anchor the sheet (Figure 4). If the tire were to be uncovered, this part could be omitted.
Layout and Dimensions
Figure 2 is a top view with dimensions. Also shown is the orientation of angle and channel stock in profile. Sheet and bar stock are not shown. The sheet is 21" x 23.75". The hold-down bolt hole on the fore crossbar is laterally centered; the hole on the aft crossbar is 1.5" off. The holes are 4.25" center to center.
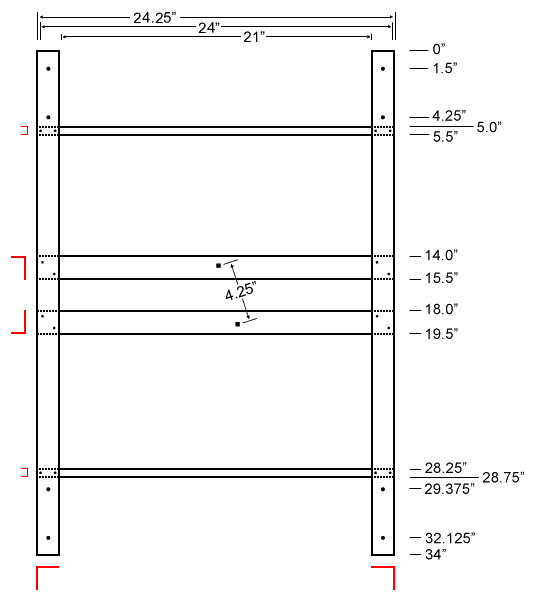 Figure 2 |
Materials and Construction
The longerons are 1/8" thick, 1.5" aluminum angle; the crossbars are the same material, with the downward-facing side trimmed to 3/4" to clear the roof. The outer stanchions are 1/16" thick, 1/2" aluminum channel. The crossbars are attached with 3/16" rivets, the stanchions and sheet with 1/8" rivets.
The hold-down bolts are 3/8" x 4.5" carriage bolts, with the holes in the crossbars squared off to receive them. The hold-down wing nuts are Dorman/Motormite (Help) p/n 41064.
Because the aluminum sheet is thinner than optimal, strips of 1/8" x 1/2" aluminum bar stock are riveted around its periphery (Figure 6) to add strength and dampen vibration. Underneath, aluminum tape seals the seam where the sheet abuts the longerons.
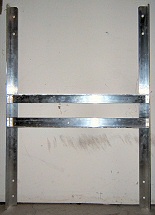 Figure 3: Basic structure (bottom view) |
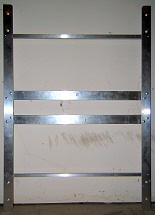 Figure 4: Stanchions added (top view) |
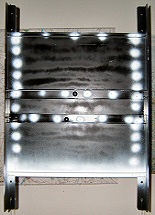 Figure 5: Sheet metal in place (bottom) |
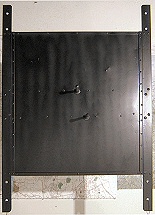 Figure 6: Flat stock secures periphery of sheet (top) |
To hold the bolts square, a 3/4" x 2" support (Figure 8) was constructed from two pieces of 3/4" x 1" aluminum bar stock, drilled through for the hold-down bolts and fixed in the shear plane with roll pins. (This part was an awful lot of work; if I were to do it again, I'd consider using hardwood instead. If nothing else, the shavings would be more pleasant!) The bolt holes in the support should match those in the crossbars: 4.25" center to center.
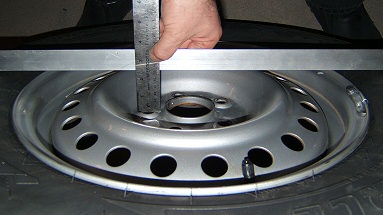 Figure 7: Measuring distance from tire sidewall to stud holes to determine clearance for hold-down bolt support (2 3/8") |
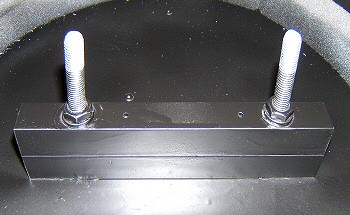 Figure 8: Hold-down bolt support assembly installed |
Installation
The attachment was secured to the OEM roof rack at each corner with a steel strap (taken from a 3.5" wide U bolt) and two 5/16" x 1 1/2" carriage bolts. The slots in the U-bolt straps are the right size to receive the square necks of the carriage bolts. The longerons and straps are padded where they contact the rack (Figure 11).
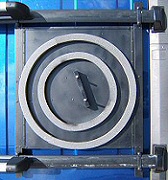 Figure 9: 1.25" square foam fills gaps |
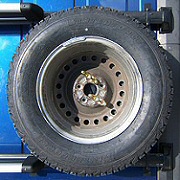 Figure 10: Tire secured with two large wingnuts |
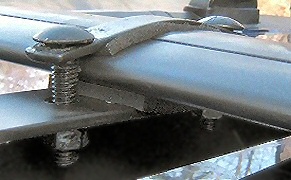 Figure 11: Mounting hardware |
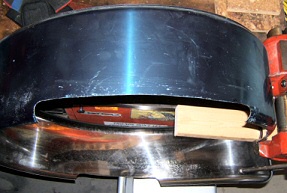 Figure 12: Cutouts to clear OEM roof rack |
|
The cover is a hard shell from tops4less.com, consisting of a plastic dish and a stainless steel ring with lock. They don't have one for 225/70-16 tires; the closest is model 94440, made for 245/70-16s.
The 94440's dish is about 29.5" in diameter. The ring is 92.5" in circumference and 8.75" wide. The dish had to be cut down to 28"; the lock buckle was moved 3.5" to allow the ring to close snugly around the tire.
Because the tire sits below the level of the OEM rack at its base yet overlaps the rack a bit at the ends, cutouts had to be made in the ring to clear the rack (Figure 12).
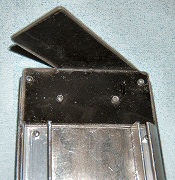 Figure 13 |
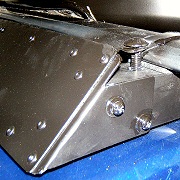 Figure 14 |
||
The sheet aluminum I was able to find locally being thin, I folded it to double-thickness and cut a 24" x 3 1/2" strip. Two side brackets were fabricated and riveted to the ends. Stiffeners made of 1/16" thick, 1/2" aluminum channel (the same material as the outer stanchions) were riveted along the top and bottom edges. The bottom stiffener's lower edge had to be turned up to clear the roof (Figure 13, lower right).
Holes in the side brackets corresponding to tapped holes in the attachment allow the deflector to be mounted with the attachment on the car (Figure 14). A slightly larger sheet, about 25 1/4" x 4 1/2", was fitted over the first. Because it's not structural, it's secured with only eight rivets and looks a little cleaner (Figure 1).
Specs
The wheel and tire weigh 55 lbs. The rack attachment, with hardware, weighs about 10 pounds. Materials cost about $85, not including the tire cover. Vehicle height is now 6' 9".
|
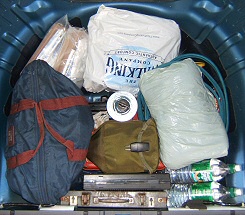
Spare Tire Well In addition to the jack and tire wrench, the spare tire well now contains a toolbox; socket set; pump; tow strap; entrenching tool; pair of boots; winter-weight jumpsuit, hat, and gloves; snow-melting kit; blanket; water; MREs; CB radio; jumper cables; and flares (Figure 15). |
Afterthoughts
The attachment didn't come out quite perfect. The sheet should have been about 1/4" aft, and the wheel mount bolts about 1/4" forward of their present position. It works fine, but the asymmetry bugs me. I tweaked the plans (Figure 2) accordingly for anybody who chooses to make one.
In retrospect, I would also make the attachment about 1/2" narrower. Initially I mounted it so that the inboard (driver's side) longeron ends fell inside the span of the OEM ski attachments (best seen in Figure 9). This necessitated removing the top mounting straps before the ski attachments could come off for the season. Moving the attachment about an inch outboard (toward the passenger's side) would avoid that step in the future—but there wasn't quite enough room. With the attachment at its outboard limit, there was about 1/4" overlap between the longerons and the inboard ski attachment mounts. Grinding a quarter inch off the passenger's side OEM roof rack mounting brackets made up the difference, allowing the spare tire attachment to slide over enough to fit. If the attachment had been about half an inch narrower, I could have avoided that. (That change is not reflected in Figure 2.)
I later added small steel plates to the top of the cover, as it's the perfect spot for magnetic-mounted GPS and satellite radio antennas.
Update, September 2007
After replacing the OEM rack with a Yakima system, I needed only to drill a few holes in the spare tire attachment to secure it to the new rack with ordinary U bolts. Now the tire and cover fit perfectly between the crossbars. With the extra width afforded by the longer, straight bars, I can fit a Yak SkyBox Pro 12 storage box next to the spare tire.