Variable Wiper Delay
BH241 pioneered this mod and reported his work in this thread at Element Owners Club.
Tools and Supplies
- About 3' of dual-conductor wire, preferably color-coded
- Medium Phillips screwdriver
- Very small slotted screwdriver
- Wire cutter
- Wire stripper
- Crimper (if using crimp-style butt connectors)
- Wire connectors: Posi-Lock or crimp-style butt connectors, small wire nuts, or equivalent
(Alternately, a soldering iron or gun, solder, and electrical tape or shrink tubing) - Continuity test light or VOM to check connections (recommended)
- Small zip ties or electrical tape
- Tiny jeweler's screwdriver or equivalent (if removing pigtails from a donor X connector or a Metra 71-7992 connector)
Parts
- 2003–08 Pilot wiper switch, Honda p/n 35256-S9V-A01
- Two pigtails for the switch connector
- Two pigtails for the X connector at the back of the under-dash fuse box
For the switch connector pigtails, you can use either Honda p/n 04320-SP0-A00 or 04320-SP0-B00. The terminals are the same on both parts. The wire gauges differ slightly, but either will work. It might be advantageous to have both, for color-coding purposes.
For the X connector, you have these choices:
- Terminals with wire stubs from the X connector of a donor (junkyard) car. This is a sure bet, and each connector contains several usable parts.
- Pigtails removed from a Metra 71-7992 connector. The 71-7992 has the advantage of being readily available, and each connector has eight of the small pigtails. The 7992 terminals don't snap smartly into the X connector the way the Honda part does, but they do work. You will have to file, cut, or fold over the tabs on the back of each terminal to make it fit into the X connector.
- Pigtails from a dealer's kit if you can match them to the ones on the X connector
- Honda wire terminals, p/n 07JAZ-001360A. You will have to crimp a wire onto each terminal
- Tyco part 173681-6. This part is available in reasonable quantities only by begging free samples from Tyco.
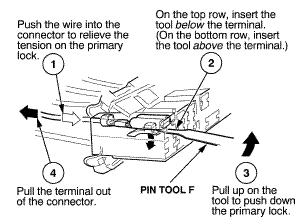
To remove terminals from the donor connector, gently press each wire in toward the front of the plastic shell to unload the locking tab, insert a tiny jeweler's screwdriver or equivalent from the front to compress the tab, and pull the wire out the back. (Figure 1 shows a different connector, but the idea is the same.)
 |
|
| Figure 1 | Honda |
Procedure
- Remove the upper and lower garnish from the steering column (Figure 2).
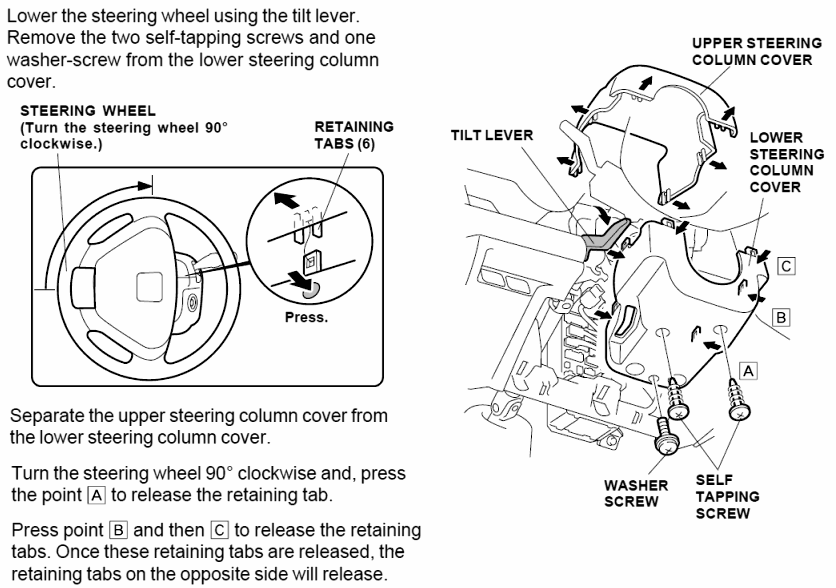
Figure 1 Honda - Disconnect the wiper switch connector by pressing the release tab and pulling straight out.
- Remove the old wiper switch by taking out two screws, prying at a point between them just enough to release a locking tab (arrow, Figure 3), and sliding the switch out to the right.
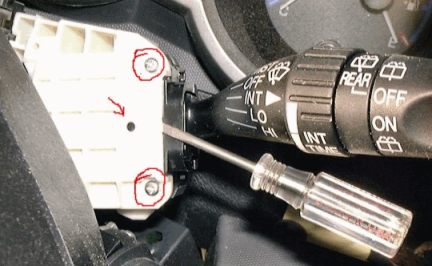
Figure 3 Gambling Element - Install the new wiper switch.
- Remove the X connector from the back of the under-dash fuse box (Figure 4) by pressing the release tab and pulling straight out.
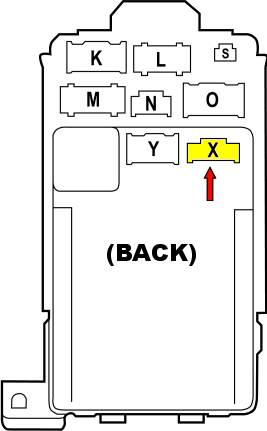
Figure 4 Ramblerdan - Release the retaining tabs on the back of the switch connector and the X connector. (The tabs on the switch connector looks like those in Figures 5–6 and are released exactly as shown; the X connector is similar.)
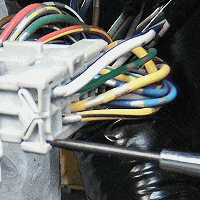

Figure 5 Ramblerdan Figure 6 Ramblerdan - Note the orientation of the pigtails inside the switch connector and add pigtails to empty slots #9 and #10 (Figure 7). Record the color coding of the pigtails.
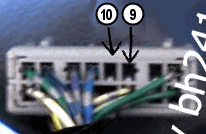
Figure 7 BH241
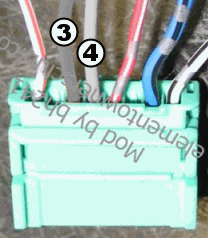
- Note the orientation of the terminals inside the X connector and add pigtails to empty slots #3 and #4 (already wired in Figure 8). Record the color coding (or other marking) of the pigtails. If you are using pigtails from a Metra 71-7992 connector, you will need to file, cut, or fold the tabs on the rear of each terminal before fitting it into the X connector.
- Replace the retaining tabs on both connectors.
- Connect one wire between X connector pin #4 and switch connector pin #9. Leave enough slack for the connector to reach to the back of the fuse box.
- Connect the other wire between X connector pin #3 and switch connector pin #10.
- Check continuity between X connector pin #4 and switch connector pin #9, and between X connector pin #3 and switch connector #10 (recommended).
- Reinstall the X and switch connectors, secure the wire, and reinstall the steering wheel garnish.
 |
|
| Figure 8 | BH241 |
[Modifications]
[Technical]
[E Home]